Editing User Access
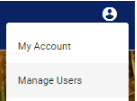
To edit the access user has to schedules, requests, and schedule generation, click on the  Account Settings icon in the upper right corner of the screen. Choose the Manage Users option.
This action will take you to the Manage Users page, where a list of user codes will be displayed.
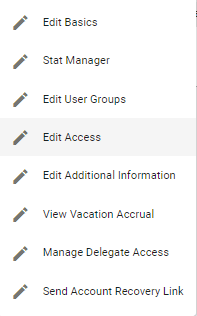
Click on the  icon next to the user whose access you would like to edit. Then choose the
  Edit Access option.
This will prompt the Edit User Access pop-up page.

In the  Schedule Access step, the user can change the level of access a user has to existing schedules.
Under Schedules, the user can change access levels for individual schedules.
For each schedule, there’s a drop-down menu with the following options:

-
No Access forbids the user from having any access to that schedule.
-
View Mine Only gives the user access only to their schedule.
-
View All gives the user access to the schedule of all users.
-
View & Assign gives the user access to all schedules as well the ability to distribute assignments to other users.
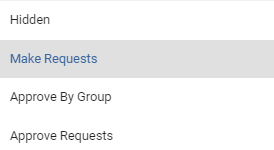
Under Request Schedules, the user can change whether the user can or cannot make schedule requests.
For each schedule, there’s a drop-down menu with the following options:
-
Hidden keeps the request option unavailable to that user.
-
Make Requests allows the user to make a schedule request.
-
Approve By Group allows the user to approve schedule requests by groups.
-
Approve Requests gives the user the ability to approve any schedule request.
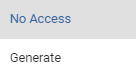
Under Generation Access, the user can change whether the user can generate schedules.
For each schedule, there’s a drop-down menu with the following options:
-
No Access forbids the user from generating schedules.
-
Generate gives the user the ability to generate new schedules.
In the  Tool Access step, the user can change the level of access the user has to Physician Scheduling tools.
Under Schedule Functionality, the user can change which access level the user has to Reports by choosing one of the options from the drop-down menu.
Administrator gives the user full managerial access to reports.
Members of Staff (varies depending on core group codes) gives users access levels associated with the core group to which they belong.
The user may also change which access level the user has to the Swaps tool by choosing one of the options from the drop-down menu:
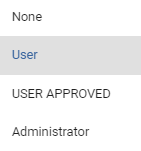
-
None forbids the user from accessing the Swaps tool.
-
User allows the user to swap schedules.
-
USER APPROVED allows users to approve schedule swaps between them without any administration involvement. — only available for systems that allow the USER APPROVED swap.
-
Administrator gives the user the ability to swap assignments as well as approve schedule swaps.
Under Other Tools, the user can change what level of access the user has to the remaining system tools by choosing one of the options from the drop-down menus available under each listed tool.
They are:
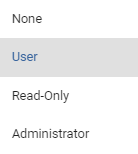
-
None forbids the user from having access to that particular tool.
-
User gives basic access to that particular tool, including the ability to make edits if applicable.
-
Read-Only gives the user the ability to view the tool, but no user or managerial access to it.
-
Administrator gives the user full managerial access to that particular tool.
Once you’re done with all changes, click on the  button.
Video Tutorial: Edit User Access
How do I view or change a user's access in Physician Scheduling: A short video of editing a user's access to schedules and tools