Reports
 Reports is the option under Tools in the left menu where users can generate, download, and email reports.
Generating and Downloading a Report
Click on the Reports option in the left menu. This action will take you to the Reports Wizard.
Select which report(s) you would like to generate under  Select Reports. Then click on
  Choose Dates to select the date range.
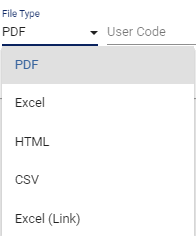
Clicking on the date will open a date selector. To choose which format the report should be downloaded as, select an option from the File Type drop-down menu.
To copy the report selection, click on the  button. This adds another row with the same report criteria. To add more dates/date ranges or report formats, click on the
  Duplicate Row icon. To delete a row, click on the
  Remove Row icon. Click on the
  button when ready to download the report. If you would like to email reports, click on
  Email Reports to email the report to selected user(s) or group of users.
If it is a standard count report, you can override what group is attached to the report. Navigate to the Group Override field and choose a non-core user group from one of the options available in the drop-down menu.
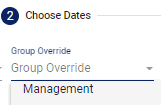
This action will update the report to produce data pertaining only to that particular selected user group. If no group is selected, the report will provide data on the users in the original group.
Video Tutorial: Single Report
How do I generate a report in Physician Scheduling: A short video to generate a single report
Video Tutorial: Multiple Reports
How do I generate multiple reports at once in Physician Scheduling: A short video to generate multiple reports
Video Tutorial: Email Reports
How do I generate and email a report in Physician Scheduling: A short video to generate and email a report